本教程整理了hexo写博客的一些常用命令以及常用方法,供大家参考,不定期更新
常用命令
清理数据
hexo clean新建博客
hexo new "My New Post"启动服务
hexo server或hexo s生成静态文件
hexo generate或hexo g部署到远端
hexo deploy或hexo d创建新的页面
hexo new page "pagename"日常备份及部署过程
写完博客后首先是在本地检查博客效果
1
2
3
hexo clean
hexo g
hexo s访问 http://localhost:4000 查看效果
确认无误后,再次清空、备份再编译部署1
2
3
4
5
6hexo clean
git add .
git commit -m "Backup"
git push -u origin main
hexo g
hexo d
写文章
文章配置
在markdown文章的头部可配置以下属性
1 | --- |
首页显示文章摘要
- 方法1:使用
<!-- more -->对文章进行截断,在这之前的内容会放到摘要里 - 方法2:在markdown文章的顶部加上
description关键字1
2
3
4
5
6---
title:
categories:
tags:
description: 你对文章的整体介绍等
---
界面修改
配置博文阅读目录
1 | toc: |
hexo备份与恢复
由于hexo在将博客部署到远程仓库时是将编译后的文件部署上去的,而源文件还是保留在本地(最核心的是文章的.md文件),因而可能存在源文件丢失的风险,如:电脑丢失,文件丢失等。因此做好源文件的备份是个良好的习惯,如果将源文件备份到github,还有利于我们在其他电脑中恢复对博客的管理。
备份
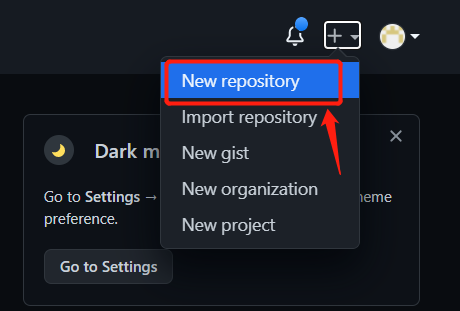
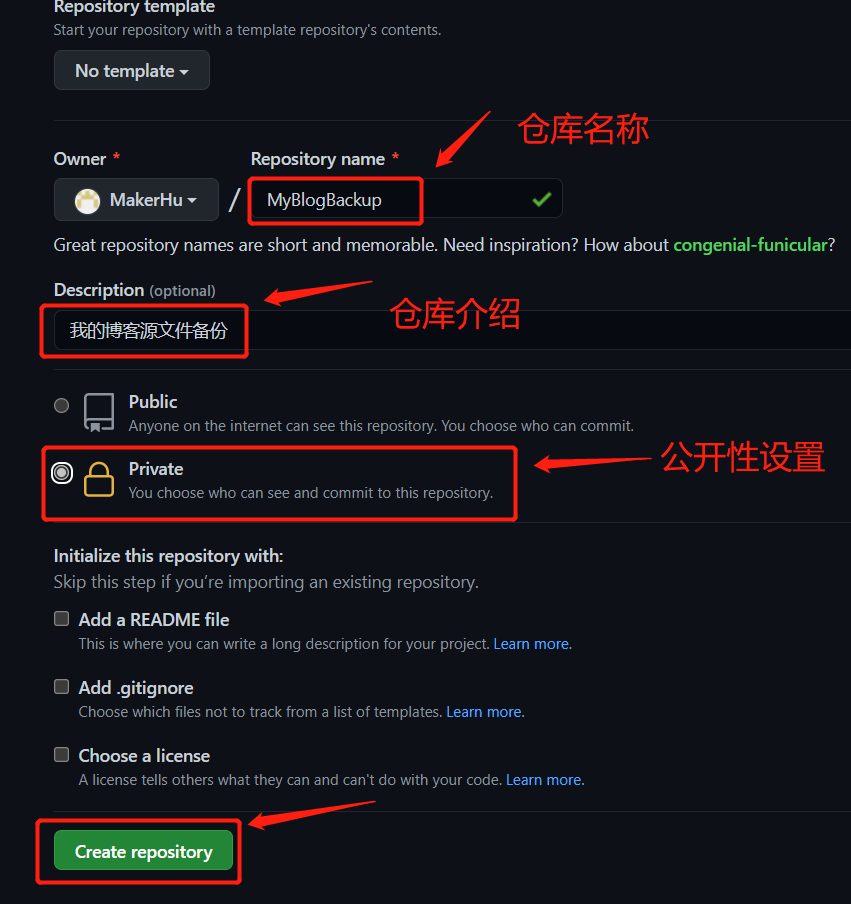
在GitHub中创建仓库
将本地的博客源文件上传到GitHub
注意:在执行下列命令前先将你博客根目录下themes/<主题名>/下的.gitignore文件删了!
原因是git文件不能嵌套,否则会报错(忘删导致报错解决方案:主题中的.git文件未删就上传远程仓库)
在你的博客源文件根目录下git bash
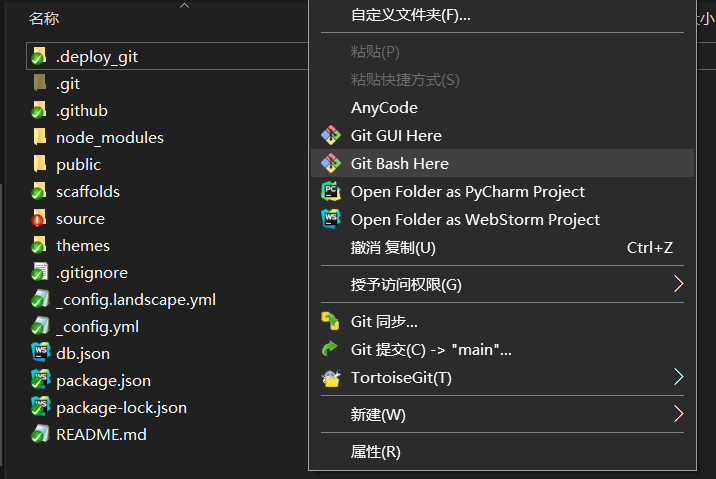
分别执行以下命令
1 | echo "# MyHexoBlogBackup" >> README.md |
若出现报错
1 | fatal: unable to access 'https://github.com/yourname/MyBlogBackup.git/': Failed to connect to github.com port 443: Timed out |
请见解决方案:git报错Failed to connect to github
恢复
默认前提:电脑中已安装git 、nodejs、hexo
克隆博客源文件
克隆项目到本地git clone https://github.com/yourname/MyBlogBackup.git
若还是出现报错:
1 | fatal: unable to access 'https://github.com/yourname/MyBlogBackup.git/': Failed to connect to github.com port 443: Timed out |
请见解决方案git报错Failed to connect to github
恢复博客
进入到博客源文件的根目录下git bash或cmd
1 | npm install hexo-cli |
接下来就是熟悉的命令了
1 | hexo clean |
日常的备份过程
写完博客后首先是在本地检查博客效果
1 | hexo clean |
访问 http://localhost:4000 查看效果
确认无误后,再次清空、备份再编译部署
1 | hexo clean |
博客链接永久化
hexo的默认永久链接是在 _config.yml 里配置的,其生成规则是permalink: :year/:month/:day/:title/
效果是https://makerhu.github.io/2021/05/05/hexo使用手册/
这种方式有两个很大的缺点:
一是路径中带中文名,复制分享链接时会转换成很长的字符串,不利于分享,以前面展示的效果链接为例,复制链接后的效果是
https://makerhu.github.io/2021/05/05/hexo%E4%BD%BF%E7%94%A8%E6%89%8B%E5%86%8C/
vshttps://makerhu.github.io/2021/05/05/hexo使用手册/二是修改博客的文件名时文章的url也会发生变化,这样如果有人收藏了你的文章地址,你改了文章名称后他/她就访问不了了
因此,博客链接永久化有着重要的意义
解决方案:使用hexo-abbrlink 插件
- 安装
npm install hexo-abbrlink --save - 配置
1
2
3
4
5
6
7
8# 可选 permalink: abbrlink 短链接模式
# permalink: posts/:abbrlink.html
# permalink: posts/:abbrlink/
permalink: :abbrlink/ #文章的永久链接
# abbrlink config
abbrlink:
alg: crc32 #算法: crc16(default) and crc32
rep: hex #进制: dec(default) and hex - hexo命令一条龙
1
2
3
4hexo clean
hexo g
hexo s # 检查效果正常后即可部署
hexo d
配置完成后博客的markdown文件顶部的Front-matter中会添加一个属性abbrlink:后面跟着的就是固定的链接地址
踩坑记录
无法将项目部署到远端
- 问题描述
hexo d时经常报错,要试好几次才能成功
报错:1
2
3
4
5
6
7
8
9
10
11
12
13
14
15
16
17
18$ hexo d
INFO Validating config
INFO Deploying: git
INFO Clearing .deploy_git folder...
INFO Copying files from public folder...
INFO Copying files from extend dirs...
On branch master
nothing to commit, working tree clean
fatal: unable to access 'https://github.com/MakerHu/makerhu.github.io.git/': Failed to connect to github.com port 443: Timed out
FATAL {
err: Error: Spawn failed
at ChildProcess.<anonymous> (E:\study\self_study\myblog\node_modules\_hexo-util@2.4.0@hexo-util\lib\spawn.js:51:21)
at ChildProcess.emit (events.js:315:20)
at ChildProcess.cp.emit (E:\study\self_study\myblog\node_modules\_cross-spawn@7.0.3@cross-spawn\lib\enoent.js:34:29)
at Process.ChildProcess._handle.onexit (internal/child_process.js:277:12) {
code: 128
}
} Something's wrong. Maybe you can find the solution here: %s https://hexo.io/docs/troubleshooting.html - 解决方案
- 取消git代理
git config --global --unset http.proxy - host文件添加最新的github的IP列表
ip列表可到这个博文获取 github被墙最新hosts-每日更新 | 天问博客 (yoqi.me)
- 取消git代理
git报错Failed to connect to github
报错:
1
fatal: unable to access 'https://github.com/yourname/MyBlogBackup.git/': Failed to connect to github.com port 443: Timed out
解决方案
方法1:- 查看git配置
git config --global -l - 检查环境变量
env|grep -i proxy
方法2:
- 分别执行以下命令:
1
2
3
4git config --global http.proxy http://127.0.0.1:1080
git config --global https.proxy http://127.0.0.1:1080
git config --global --unset http.proxy
git config --global --unset https.proxy
- 查看git配置
主题中的.git文件未删就上传远程仓库
由于.git文件不能嵌套,因此需要删除themes/<主题名>/下的.git文件才能上传
- 删除themes/<主题名>/下的.git文件
- 从暂存区删除该文件夹
git rm --cache themes/next - 重新添加到git中
git add .